Friday 26 September 2014

Fabric Bow :)

I LOVE good packaging.  I love those extra special embellishments that really say that you've taken the time and effort to make the gift or goodie something extra special. I wonder if you could make a fancy stacked bow out of fabric and have it still have a crisp form?  I started to play around and sure enough you can.  Here is how to make a DIY fancy bow out of fabric


Here is your supply list…
Fabric: You can used fat quarters and they work perfect for this.
Interfacing: It is a textile used on the unseen or "wrong" side of fabrics to make an area of a garment more rigid.
Stapler & Staples
Glue Gun & Glue Sticks
Iron & Ironing Board
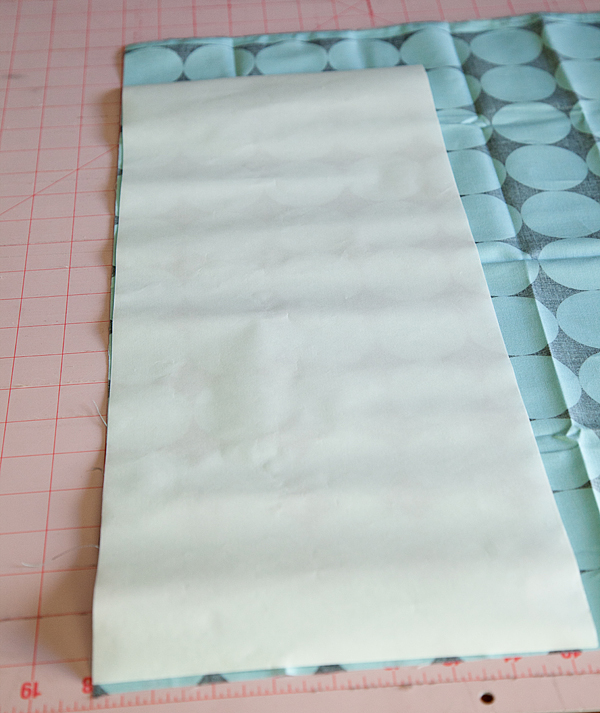
Cut fabric interfacing to 8×20 inches. Iron the "right" side of the interfacing to the wrong side of the fabric.
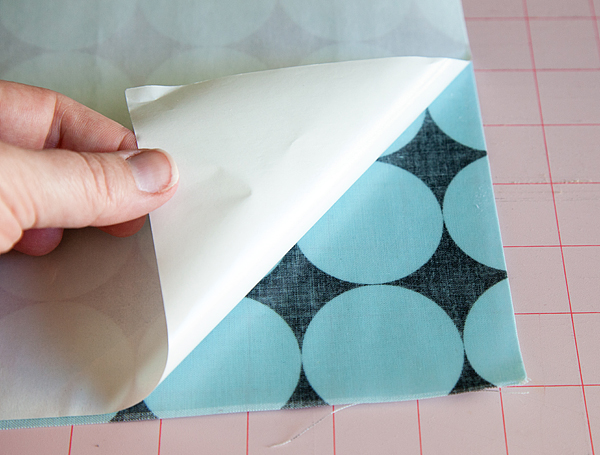
Let the fabric cool and then peel the paper from the interfacing that is now affixed to the the fabric.
Place another piece of 8×20 fabric "right" side up on the top of the "wrong" side, with the interfacing sandwiched in the middle and then iron together.
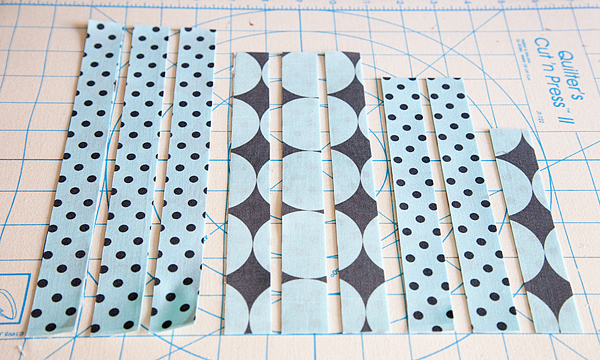
Cut fabric into 9 strips:
Three 10 inches
Three 9 inches
Two 8 inches
One 6 inches

Starting with the first 10 inch strip of fabric, make a loop on one end with the tail meeting up in the middle. Flip the fabric over and do the same with the opposite end witht he tails meeting in the middle and overlaping slightly.
  
Place a staple or two to secure the two loops.
Repeat with the rest of the 10, 9 & 8 inch strips of fabric.
Start to layer each section starting with the largest {10 in.} loops criss crossing them and adding a dab of hot glue in the middle to secure.
  
Continue Layering the largest to the smallest in the criss cross pattern until you have used all of the 10, 9 & 8 inch loops.  With the 6 inch strip of fabric, make a simple loop making sure to size it to bow. Secure with a staple or a dab of hot glue.  Then place at the top of the bow with a dab of hot glue. Voila… You now have a stunning fabric bow!
Source: Whipper Berry

Friday 8 November 2013

String Art :)

Hey guy :) Todays post is directly from the blog I visited few days back :)

In her words:
This time I'm showing you how to make some string art for the little one’s room!


Rather than deal with hammers and cutting wood, I decided to do this project using cork tiles.  Not only are they easy to find and inexpensive, they're also very lightweight so you don't have to worry about them falling off the wall and hurting anyone.
Here are the supplies you'll need:

Stack the cork tiles on top of each other and use your contact cement to glue them together.  Put them under some heavy books for an hour or so to allow to dry completely.
I really wanted the look of a white background for my string art so I decided to paint the cork.  If you're fine with the cork color/texture background, then feel free to skip this step.  I used some leftover latex paint I had and a styrofoam mini roller — nothing special.
Once the paint has dried, flip your cork tile over and apply your hanging strips.  Do this now so that you don't have to deal with it once all your nails are in.
Create your template using whatever font you like.  My “c” is 900 pts big for your reference.  Center your template on your cork tiles and tape it down.
Trace the outline of your letter with your linoleum nails by pushing them in right over the paper. The cork is nice and soft so they should push in pretty easily. {NOTE:  If you’re working with a letter that has a center such as a D or an O, you don’t have to cut out the center of the template.  Push the nails right into the cork over the paper.}
When you've traced the entire template, carefully remove the paper.  Work slowly and you’re nails will stay in place.  Now your canvas is ready for stringing!
Tie your string in a double knot onto your first nail now, and start weaving in a back and forth fashion.  The less you think about this the better.  I actually found it to be quite therapeutic. Just let it flow.  If you don't like the way a certain section looks, unwind and do it again.  It’s very forgiving.
When you reach the end of your letter, tie another double knot onto your last nail.  Trim and you're done!
What do you think?  Will you be trying some string art of your own?  If you're feeling particularly ambitious, you can follow this same technique and do a whole name like below, the steps are very similar, just on a larger scale!
Source: Honey And Fitz

Tuesday 23 July 2013

Cookie Dough Popsicle :)

There is only one thing to do when a mean craving for freshly baked Chocolate Chip Cookies hits in the middle of a summer heatwave  make Chocolate Chip Cookie Dough Popsicles! Feel free to preheat your oven and get out the flour if you must…I’ll be outside enjoying one of these sweet no-bake treats and cooling off.

popsicles cookie dough Cookie Dough Popsicles

Chocolate Chip Cookie Dough Popsicles: (Makes 10 Popsicles)
Ingredients:
2½ cups whole milk
1/3 cup light brown sugar, packed
1/3 cup granulated sugar
generous pinch of salt
3 tsp. pure vanilla extract
1/2 cup semi sweet chocolate chips
Directions:
Place milk, brown sugar, white sugar and salt in a small saucepan and cook stirring over low heat until sugar dissolves. Remove from heat, let cool and stir in vanilla.

Divide half of the chocolate chips between the bottoms of your popsicle molds. (reserve the other half of the chips for later) Fill molds with milk mixture leaving a small amount of room on top.


Freeze until only partially frozen, about 2 hours. Remove from freezer and add the remaining half of the chips. Insert sticks and freeze until solid.

Hope you try and like them :)


Source: Freutcake

Saturday 4 May 2013

Homemade Sidewalk Chalk :)

One of our favorite outside activities at our home is drawing with chalk on the driveway. You can play hopscotch, four-square, and of course draw and create silly stories. I love playing hopscotch and thought about how to make chalk, and I thus came across this :) Sounds like a lot of fun..

What you will need:
Toilet paper or paper towel tubes
Scissors
Duct tape
Wax paper
Small bucket or disposable container to make the recipe
¾ cup of warm water
1 ½ cups Plaster of Paris
2-3 tablespoons of tempera paint
Paper bag or a “mess mat”

** to make six tubes of chalk – simply doubled the above recipe.**

homemade handmade chalk tutorial by modern handmade child

Step 1: If you are using paper towel tubes, cut each tube in half, so it is roughly the length of a toilet paper roll tube.

Step 2: Cover one end of each tube with duct table to hold the contents within.

Step 3: Cut as many pieces of wax paper as you have tubes. Roughly 6 inches X 6 inches. Roll the wax paper loosely and insert into the tubes so as to effectively line the tubes. The top of the wax paper will be higher than the tubes. The wax paper liner will keep the chalk mixture from sticking to the cardboard tubes and will eventually be peeled off.

Step 4: Pour the warm water into your bucket. Sprinkle the Plaster of Paris over the water and stir the mixture with a plastic spoon. The Plaster of Paris roughly starts hardening within 20-30 minutes, so you need to work fast so that it does not harden too quickly.

Step 5: Next you will want to pour the tempera paint into the Plaster of Paris mixture and stir so that it is mixed thoroughly. If you would like brighter colors  add more tempera paint into the mixture. You can make a variety of colors of chalk, spoon about 1/2-3/4 cup of Plaster of Paris in each separate container and mixed in the different tempera paint colors into each bowl. In this case you would ended up making six different colors.

homemade handmade chalk tutorial by modern handmade child

Step 6: Stand each tube with the tape side down on a cookie sheet/flat baking dish/box lid to make the project easier to transport to a drying location.  Pour or spoon the colored Plaster of Paris mixture into the wax paper lined tubes. Lightly tap the sides of the tubes to release the air bubbles (so you do not have holes in your chalk). After you have poured the mixture into the tubes start another color. When done trim the excess wax paper so that it is closer to the cardboard tube.

Step 7: It can take around 3 days for the chalk to dry. On the last day, peel off the duct tape so that the underside could dry. When the chalk dries, peel off the paper tubes and wax paper. Your chalk is ready!

homemade handmade chalk tutorial by modern handmade child

Source: Oh My Handmade

Wednesday 20 February 2013

Bohemian Rainbow Wedding


Happy Tuesday everyone! I hope you all had a wonderful long weekend. I have a sweet, romantic, whimsical wedding to start the week off today. 
Jenn + Matt had so many unique details to their wedding to really make it theirs. I love that they had their bridal party in rainbow colors because the rainbow is a symbol of promise and they watered a tree together during their ceremony that they plan to plant behind their house and watch grow every single day. Gorgeous photos thanks to Three Nails Photography.
Its all in the words of the bride :)
rainbow bridesmaids dresses
bride with flower halo
all you need is love

The wedding was held at the weekend/camp house of a family friend. They let us use the camp as a gift to us, we saved a lot – and are so grateful! Plus, it is gorgeous and private!!
bride with flower halo
groomsmen in rainbow suspenders
rainbow bridesmaids dresses
rainbow eye shadow
rainbow wedding bridal party

I walked down the aisle to the song “everlasting light” by the black keys. This is also engraved into his ring. It’s a special song to us, and the intro was great for the bridal party to bee bop down to!
outdoor wedding ceremony
watering tree during wedding ceremony
outdoor wedding ceremony
wedding in the trees
bride in flower halo
black and white wedding photography
bride in converse chuck taylor allstars sneakers
bride and groom in woods

Most memorable moment of the day?
Mr. says when I walked down the aisle – and when I forgot my vows!! I have a hard time choosing, hiding behind the bush before I walked down the aisle, my dad getting on me for picking my nose (I didn't want boogers and forgot to check…don’t judge!), when Matt and I kissed, when I went overboard stuffing his face with cake, sitting around the water after most guests left with all my old friends.
bride and groom fine art photo
rainbow dessert table
ring bearer in suspenders
butterfly wedding cake
wedding first dance
wedding exit sparklers

How did you make the day about the two of you?

We thought about how we would do everything, there was no “this is how it’s supposed to go” and leave it at that. Every detail showed our individuality, such as the tree planting – something that intertwines our love of nature into the ceremony and something we will grow with. All of the decorations and details were crafted by myself, family, and friends. We added wording to the pastor’s (who is an inspiring person in our life and Matt’s boss) speech that meant a lot to us and we wrote our own vows.
Any advice for those planning now?
Spend the most on photography/videography. Don’t stress over details. Have back-up bridesmaids/groomsmen. Make sure not to let the day be controlled by someone else. Make it personal to you and your groom, don’t be afraid to break tradition. You aren't close with people who are so uptight they’ll be mad at you for something you decided to do for you & your new hub!
Thanks so much Jenn + Matt for sharing your day with us. We wish you both the best life together!! And for those of you reading and in love with their gorgeous photos by Three Nails Photography, you will want to head over to his blog and check out his contest where he is giving one lucky couple free wedding photography!

Tuesday 1 January 2013

Pudding Cups

IMG_9670

Wicked Good Chocolate Peanut Butter Pudding Cups. They’re from the book, Sticky, Chewy, Messy, Gooey Treats for Kids by Jill O’Connor and just as good as their name states. These pudding cups, they are really fun to make and even more fun to eat. You’ll see what I mean in a minute.
Untitled-2
IMG_9039
IMG_9044
Let the pudding chill for at least four hours before eating.
Now, here’s the best part.
It involves balloons to make bowls.
IMG_9326
We blew up regular size balloons about halfway so they were still small, but found that water balloons worked best. They are a perfect size for this project, just hard to fill with air instead of water. I about busted a lung.
After you blow up the balloons, wash them off and let them dry. And before you use each one, spray a little non-stick cooking spray on each. Just a little.
Okay, here’s what you do.
Melt some semi-sweet chocolate, white chocolate or confectionery coating. Let it cool slightly before using. It doesn't need to be super hot.
IMG_9388
Spoon a small amount on a wax-paper-covered baking sheet.
IMG_9393
Then take one of your prepared balloons and dip it in the chocolate. Dip it in enough so the chocolate makes a bowl shape around the balloon.
Remove from the chocolate and place the balloon gently on top of the chocolate waiting on the baking sheet.
IMG_9401
And repeat.
Untitled-1
Repeat. Repeat. Repeat.
IMG_9460
It’s as easy as one…
IMG_9461
two…
IMG_9469
three!
IMG_9479
And like I said earlier … just fun. 
You can place the tray of balloon bowls in the refrigerator to speed up the drying time.
IMG_9486
Then it’s time for the really fun part.
Pop them all with a pin.
IMG_9516_2
Gently remove the balloon carnage from the inside of the cups and they are ready to go. If you want, you can also serve other treats in them like ice cream.
IMG_9540
But we had wicked good pudding waiting in the fridge. Fill each cup as full as you want.
IMG_9560
Then you can top them off with whipped cream.
IMG_9573
Lots and lots of whipped cream.
To make Jill’s Sweetened Whipped Cream, just chill a metal bowl and beaters in the freezer for about 15 minutes (to help whip the cream faster). Then combine 2 cups heavy cream, 1/2 cup powdered sugar and 1 teaspoon vanilla. Beat on medium-low using a mixer until the cream starts to thicken. Then increase speed to medium-high and beat until firm peaks form.
IMG_9584
Finally, you can add some sprinkles. As few…
IMG_9603
or as many as you like.
IMG_9619
Want some?
IMG_9631
Come on… you know you do.
IMG_9650
And when you’re all finished, you can eat the bowl, too.
IMG_9691
Enjoy making a mess!
Source: Bakerella